Superior Pathology

PCR Using DNA From FFPE Tissue Samples: A How-To Guide

Polymerase Chain Reaction (PCR) is a widely accepted technique used in molecular biology, aiding researchers in amplifying and analyzing specific DNA sequences with heightened accuracy. However, when DNA is extracted from Formalin-Fixed, Paraffin-Embedded (FFPE) samples, you’ll face unique challenges due to DNA fragmentation and chemical modifications introduced during the preservation process. 

In this complete how-to guide, we walk you through how to perform PCR on FFPE-derived DNA. We share helpful tips and best practices, ensuring your PCR testing is accurate and efficient. Whether you’re an experienced researcher or utterly new to this field, our guide will give you the knowledge and expertise to achieve reliable results in your PCR analyses. Keep reading if you’d like to learn how to conduct PCR techniques on DNA collected from FFPE tissue samples!

Researcher holding PCR tube to put into PCR machine

What Are FFPE Tissue Samples?

Formalin-fixed paraffin-embedded (FFPE) tissue samples are essential to scientific and medical research. FFPE is a preservation technique that aids in maintaining the cellular and tissue structure of biospecimens, preparing them for various purposes, including cancer research, genetic studies, immunohistochemistry (IHC), translational clinical research, and more. 

FFPE tissue samples are fixed in formalin, embedded in paraffin wax, and stored in biobanks, laboratories, or hospitals. After the preservation process, these samples can be used for decades. 

The Basics of PCR

Polymerase Chain Reaction (PCR) is a widely used technique in which short sections of DNA or RNA are amplified into multiple copies using primer-mediated enzymes. PCR allows researchers to make billions of copies of a specified DNA gene or fragment, permitting the investigation and identification of gene sequences using visual tactics based on charge and size.

polymerase chain reaction

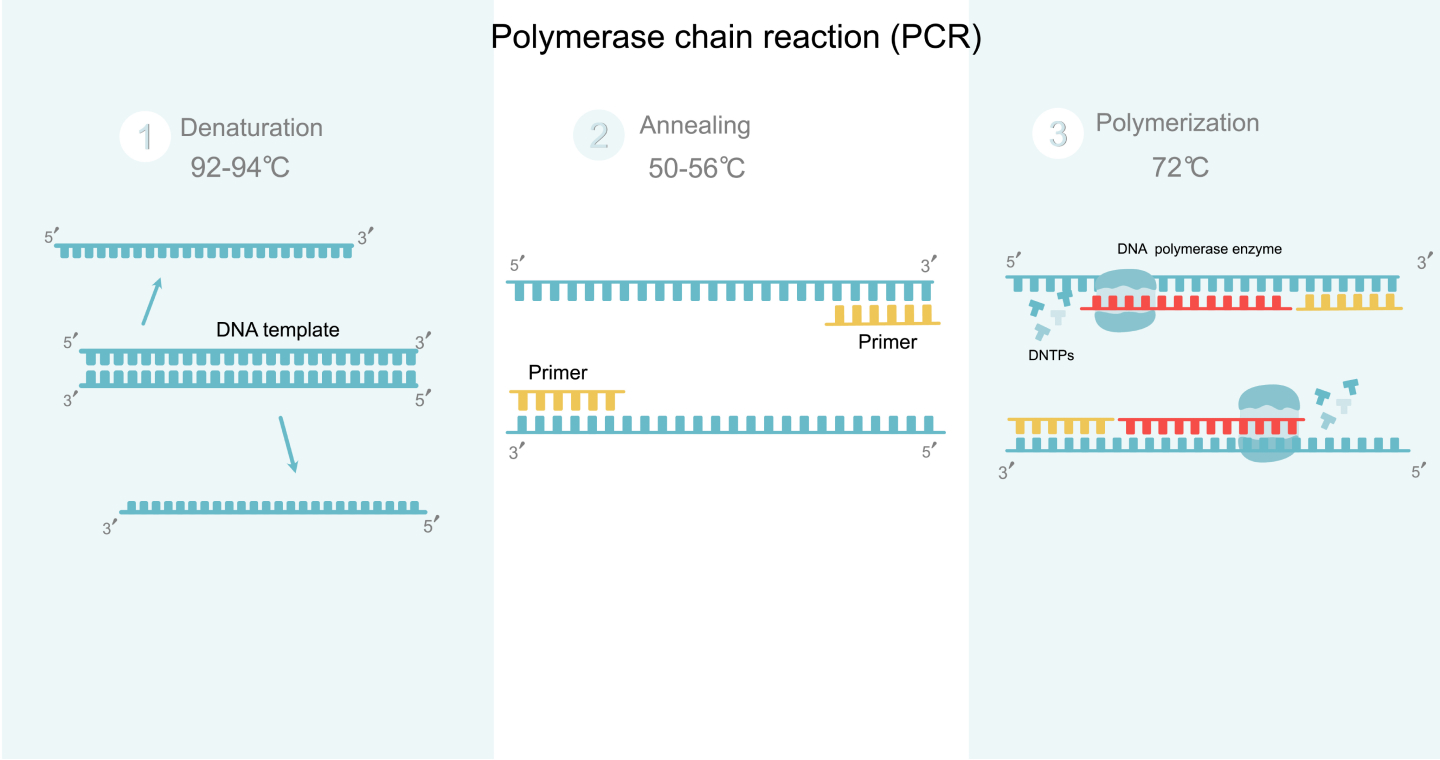
There are 3 primary steps involved in PCR: denaturation, annealing, and extension. Outlined below is what happens during the amplification process: 

  1. Denaturation: Denaturation involves heating the selected double-stranded DNA sample to about 94℃ for 0.5–2 minutes. This temperature breaks down the hydrogen bonds between both strands of DNA, converting them into a single strand. Researchers will use this single-stranded DNA as a template for producing new strands. If necessary, the high temperature must be applied for an extended period to ensure the separation of the two strands. 
  2. Annealing: Next, researchers will lower the temperature to 54–56℃ for about 20–40 seconds. During this time, the primers will anneal or stick to their complementary regions on the template DNA. Primers are sections of single-stranded RNA or DNA around 20–30 bases in length. Lowering the temperature allows hydrogen bonds to form between the template DNA and primers in areas where the section corresponds. Both separated strands of DNA run in opposite directions with two primers: a forward and a reverse primer. 
  3. Extension/Polymerization: During extension, the temperature is again raised to 72–80℃. Then, the DNA polymerases are added to the 3’ end of each primer. These enzymes move along the DNA base by base in the 5’ to 3’ direction, adding the matching DNA nucleotides as it goes. The DNA polymerase often adds about 100bp/minute under pristine conditions. As the polymerase attaches to the primer, it adds DNA bases to the single strand, resulting in a double-stranded DNA molecule. 

Denaturation, annealing, and extension are usually repeated 20–40 times to obtain the necessary number of DNA sequences of interest quickly. PCR testing contributes to diagnosing infectious diseases, monitoring the gene in gene therapy, genetic fingerprinting and paternity tests in forensic science, finding small amounts of cancer cells that could be overlooked in other studies, and more.

Can You Do PCR On DNA From Formalin-Fixed Paraffin-Embedded Tissue? Yes, Here Are 5 Steps You Can Follow

If you’d like to try PCR testing on DNA extracted from FFPE tissue samples, here are 5 simple steps you can follow:

Prepare the FFPE Tissue Samples for DNA Extraction

You’ll need to use a microtome to cut the exposed FFPE tissue samples into thin sections (5–10 micrometers). A microtome slices specimens continuously, creating a “ribbon” of tissue sections that can be used for DNA extraction. After cutting, you can place the FFPE tissue sections in microcentrifuge tubes. Then, the FFPE tissue samples need to be deparaffinized. Remove the paraffin using a series of xylene washes and ethanol rinses to rehydrate the biospecimens. 

Extract DNA and Run a Quality Assessment

After preparing the FFPE tissue samples, it’s time to treat the deparaffinized specimens with proteinase K. This enzyme allows the specimens to break down a wide range of proteins and release DNA. The use of proteinase K in DNA extraction reduces the risk of false negatives or various errors that can arise in diagnostic studies. 

Incubate the DNA and proteinase K mixture at 55–65℃ for several hours or overnight, ensuring the protein contaminants are removed from the DNA samples before the PCR process. This will increase the likelihood of reliable results. Following incubation, use a DNA extraction kit (specialized for FFPE samples) or phenol-chloroform extraction to purify the DNA.

It’s essential to quantify the DNA concentration at this time. A spectrophotometer (e.g., Nanodrop) or fluorometer (e.g., Qubit) is used to measure the DNA concentration. Additionally, ensure the quality of the DNA by running a small section on an agarose gel. The FFPE DNA is commonly fragmented, which is normal. 

Optimize and Prepare PCR Setup

Before performing PCR testing, you need to prepare the setup and ensure quality at every step. Here are 3 best practices for optimizing your PCR process:

    1. Practice Expert Primer Design: Due to the formalin fixation process, FFPE specimens often contain highly fragmented DNA. In this case, design a primer that amplifies short DNA sections (100–300 base pairs). Professional primer design technology (e.g., Primer3, NCBI Primer-BLAST) should be used to make certain the primers are customized to the specified sequence instead of forming secondary structures or primer dimers.
    2. Invest in High-Quality PCR Reagents: We recommend using a high-fidelity DNA polymerase, precisely one that’s compatible with complex templates. These polymerases are increasingly tolerable to the inhibitors often appearing in FFPE-derived DNA. For your PCR buffers, use ones that are provided with high-fidelity DNA polymerases since they’re ideal for challenging templates. 
    3. Include Additives: PCR additives or enhancers can improve the overall amplification efficiency. Consider adding bovine serum albumin (BSA) or dimethyl sulfoxide (DMSO) to stabilize the polymerase and improve the PCR process on difficult DNA templates. Other additives, including betaine or formamide, can also reduce the chance of secondary structures. 

After gathering your supplies, it’s time to prepare the PCR setup. Assemble the PCR reaction mixture, including the primers, template DNA, deoxynucleotide triphosphates (dNTPs), buffer, polymerase, and any chosen additives. Then, consider the ideal PCR cycling conditions for your process, which involve denaturation, annealing temperature, extension time, and the number of cycles. 

Perform the PCR Amplifation Process

Using a thermal cycler, you’ll then perform the PCR process on the FFPE-derived DNA. As we’ve mentioned prior, there are 3 steps involved in amplification: denaturation, annealing, and extension. If you’re new to trying PCR, doing a temperature gradient during the process is helpful. Here are the standard cycle conditions for PCR you can start with according to University of Nebraska’s Herman Lab:

Conditions

Guidelines

Denaturation

Temp: 95℃. Time: 2 minutes on initial cycle; 30 seconds to 1 minute on rest.

Annealing

Temp: 5℃ below Tm (melting temperature) of the primers; no lower than 40℃. Time: 30–45 seconds. This is the step where you’d use a gradient.

Extension

Temp: 72℃. Time: ~1 min/kb of the expected product; 5–10 minutes on the last cycle.

Number of Cycles

~30 cycles

Analyze the PCR Products

Once you’ve finished the amplification testing, analyzing the PCR products is crucial to ensure the process is successful. Use agarose gel electrophoresis to determine effective amplification and correct amplicon size. If needed, you can purify the PCR products by utilizing a PCR cleanup kit for purposes such as sequencing or cloning.

Obtain FFPE Tissue Samples for Your PCR Analysis

Are you in need of high-quality FFPE tissue samples for PCR testing? Superior BioDiagnostics has a biorepository containing thousands of pristine FFPE tissue samples that are available for your research purposes. Our biobank specializes in normal, malignant, and disease-state FFPE specimens collected from various anatomical sites, including but not limited to breast, cervical, lung, muscle, and uterus samples. Contact Superior BioDiagnostics today to order FFPE tissue samples and ensure accuracy in your PCR analysis.